Render
| Toolbar | Menu |
|---|---|
|
|
Render Render |
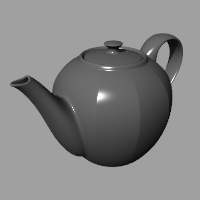
Render 指令旨在以目前的渲染器在另一个视窗渲染模型。
设定目前的渲染器
- 从渲染 功能表,选择目前的渲染器。
- 从清单中选择您想要使用的渲染器。
附注
- 物件的渲染颜色可以从材质面板里的材质、物件的属性或物件所属的图层设定。
- 如果您要渲染的物件非常复杂,第一次渲染时 Rhino 可能需要一些时间产生渲染网格,下次渲染时 Rhino 就不需要再次产生渲染网格,所以速度会快一点。
渲染基础
除着色预览以外,Rhino 提供包括色彩、灯光、透明度、阴影、贴图以及凹凸贴图等要素的完整渲染功能。
在您为物件定义颜色、高光、贴图、透明度、凹凸等属性之前,渲染物件将呈现白色。这些属性可以通过属性面板的材质页面来定义。
基本的模型渲染有四个步骤:
-
设定环境
-
加入照明
-
赋予材质
-
Render
前三个步骤并没有绝对的先后顺序,您必需持续调整这三个步骤的设定,不断渲染测试,直到得到自己觉得满意的结果。
灯光
在 Rhino 渲染中,Rhino 用户可以控制光源来为物件照明。如果您没有在场景中添加任何灯光,将使用默认灯光,默认灯光是平行光定向光源。
材质
可以在材质中定义在渲染器所使用的颜色、透明度、贴图以及凹凸贴图。
 赋予给图层
赋予给图层
在材质面板中
赋予给图层...
- 右键单击材质然后选择赋予给图层...
- 在选择图层对话框中,选取您需要的图层。
赋予给物件所在的图层
- 右键单击材质然后选择赋予给物件所在的图层
- 在工作视窗中选取一个物件,将材质赋予给此物件所在的图层。
在图层面板中
- 通过单击一个或多个图层的名称来选择它们。
- 点击选定图层的材质图标。
-
在图层材质对话框中,选择一种材质或者创建一个材质。
Type a letter to navigate to the first material in the list with a name starting with the letter.
通过选取物件
- 选取一个或数个物件。
- 在材质面板中,右键单击材质然后选择赋予给物件所在的图层。
通过拖拽
- 从材质面板中拖拽一个材质,然后将其拖放到图层面板中的一个图层上。
 将材质赋予物件
在材质面板中
- 选取一个或数个物件。
- 在材质面板上,右键单击材质然后选择赋予给物件。
在属性面板中
- 选取一个或数个物件。
- 在属性面板中,点击材质按钮。
- 从下拉列表中选取或者创建一个材质。
通过拖拽
- 从材质面板中拖拽一个材质,然后将其拖放到一个物件上。
光标移动到物件上时物件将高亮显示。
底平面
底平面为图像提供了一个无限延展的平面,该平面在其所在高度上向各个方向延伸至地平线,底平面的渲染速度比使用曲面作为背景要快得多,任何材质都可以分配给底平面。
 建立底平面
建立底平面
- 打开底平面面板。
- 设置底平面属性。
渲染环境
环境描述模型四周的空间环境,这个空间环境可以在物件上反射出来,并提供整体照明
渲染
渲染并保存图像
 渲染并保存图像
- 从渲染功能表,选择渲染。
-
在渲染工作视窗文件列表中,选择另存为。
Rhino Image File Format (.rimage)
Rhino Render can save .rimage files. This is a proprietary file format that stores all of the information rendered by the rendering engine, including color, alpha, depth, normal channels, all with 32-bit per-channel resolution.
This information is used by the render window to execute the post-effects and exposure operators, and can also be used by custom controls implemented by a third-party renderer to achieve other effects.
Immediately after render time, the .rimage format can be used to store the data so that post-processing and exposure adjustments or format changes (saving in a different format without loss of information) can be done later.
The .rimage format is only supported by the Rhino render window. It cannot be loaded into any other software. It is a high-dynamic range format that supports lossless information transfer to .HDR and .EXR formats. It is uncompressed and the files can be huge.
To open an .rimage file
- In the Rhino render window, on the File menu, click Open.
Or - Use the RenderOpenRenderImage command to open an .rimage file without having a render window open.
Completed renderings are saved in the .rimage format to a temporary location on your hard disk. Once one of the renderings is re-opened, all post effects and exposure settings are available as if the rendering were just completed.
To open the most recent .rimage file
- In the Rhino render window, on the File menu, click Recent, and then choose a file.
The files are named the by date and time of the rendering.
For more information about post processing the rendered image, see: Post-processing rendered images.
渲染指令行/脚本指令
|
Toolbar |
Menu |
|---|---|
|
|
Render Batch Render Named Views |
BatchRenderNamedViews 指令可以渲染模型中的所有已命名视图,并将渲染结果保存为图像文件保存到一个文件夹中。
步骤
-
将要渲染的视图保存为已命名视图。
-
进行渲染设置。
-
执行 BatchRenderNamedViews 指令。
-
选择一个文件夹。
已命名视图以列表顺序呈现,并以名称保存。
请参考
NamedView
Manage the named views.
| Toolbar | Menu |
|---|---|
|
|
|

The RenderArctic command renders opaque materials, scene lighting, ground plane and background as if they are white.

指令行选项
影响材质
Turn off to exclude materials.
- Objects with transparent materials assigned always render with their materials even though AffectMaterials is turned on.
影响灯光
Turn off to exclude scene lighting.
影响底平面
Turn off to exclude ground plane.
影响背景
Turn off to exclude the background.
请参考: 维基百科: Ambient occlusion。
| Toolbar | Menu |
|---|---|
|
|
|
CloseRenderWindow 指令用于关闭渲染显示视窗。
在执行多个渲染时非常有用。与 SaveRenderWindowAs 令结合使用时,您可以创建多个渲染并将它们保存到脚本中的不同文件中。
| Toolbar | Menu |
|---|---|
|
|
|
CopyRenderWindowToClipboard 指令将渲染视窗中的图像复制到剪贴板。
| Toolbar | Menu |
|---|---|
|
|
|
RenderBlowup 指令使用渲染面板中设置的分辨率在渲染视窗中渲染当前工作视窗中选取的区域。
| Toolbar | Menu |
|---|---|
|
|
|
RenderInWindow 指令以工作视窗的分辨率在渲染窗口中渲染当前工作视窗中选定的区域。
| Toolbar | Menu |
|---|---|
|
|
Window Panels > Rendering |
Rendering 指令可以打开渲染面板,可以快速访问渲染文件属性面板。
Current Renderer
Sets the current renderer. This can be the built-in Rhino Render or a plug-in.
View
Specify a source for the view.
Current Viewport
Renders the current viewport.
Specific Viewport
Select a viewport to render from the list.
Named View
Select a named view to render from the list.
Snapshot
Select a snapshot to render from the list.
Resolution and Quality
Dimensions
The aspect ratio displays to the right of the menu.
Viewport (<size>)
Renders the active viewport the active viewport using the pixel size of the viewport.
Custom (<size>)
Renders the active viewport using the custom resolution. Type the custom width and height resolution in pixels.
Preset sizes
Renders the active viewport with the selected pixel dimensions.
If you add a text file named render_sizes.txt to the folder where the Rhino executable file resides, Rhino Render and some other renderers will read this text file for custom preset sizes.
Example:
// My custom render sizes
500,500
600,600
700,700
800,800
900,900
Where is the Rhino executable file?
-
In Windows File Explorer, browse to C:\Program Files\Rhino 8\System
Lock to viewport aspect ratio
Maintains the aspect ratio of the viewport. When the height or width is changed, the other dimension changes in relation.
Size
Calculates the size of the image in the selected unit system based on the Resolution and DPI ("dots" per inch) settings. This is useful for determining the size of the image for printing.
Units
Sets the image size in pixels, inches, millimeters, or centimeters.
DPI
Image pixels ("dots") per inch.
Quality
Low quality
Render 15 samples.
Draft quality
Render 50 samples.
Good quality
Render 500 samples.
Final quality
Render 1500 samples.
Backdrop
The backdrop is what you see directly in front of the camera if there are no objects in the way. The background is not 3‑D — it exists only on the screen.
Solid color
Displays a solid color.
To select the color for the background
- Click the color swatch.
Gradient
Displays a two-color gradient. The color for the top of the image background is the Solid color set above.
To select the color for the bottom of the background
- Click the color swatch.
360° Environment
Displays the portion of the current environment that the camera sees in the viewport.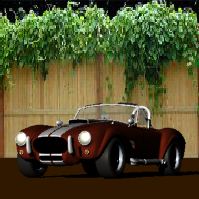
 New
New
Creates a new environment using a template from the library.
 Edit
Edit
Edits the selected environment.
See: Environment Editor.
 Duplicate
Copies the selected environment to a new environment with the same settings.
Wallpaper
Displays the current viewport wallpaper.
Wallpaper in perspective viewport.
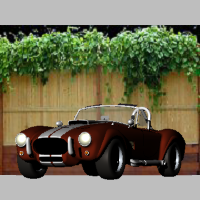
Stretch to fit
Fits the wallpaper to the rendered view.

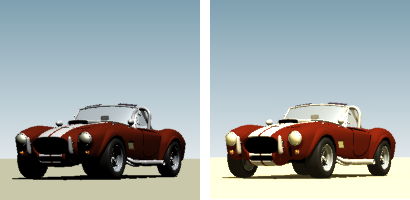
Wallpaper at normal aspect ratio (left) and stretched to fit (right).
Transparent background
The background is rendered with an alpha channel for transparency. The image must be saved to a file format that supports alpha channel transparency (.png, .tga, .tif).![]()
Ground plane
Turns on the ground plane.
Ground Plane Settings
Opens the Ground Plane panel.
Use custom environment for reflections
Assigns a custom environment that will be reflected by objects in the scene.
New
Creates a new environment using a template from the library.
Edit
Edits the selected environment.
See: Environment Editor.
Duplicate
Copies the selected environment to a new environment with the same settings.
Default environments
No environment
The No environment setting applies a plain gray background.
Studio
The Studio environment offers soft lighting provided by a high-dynamic range image.
Studio lighting example (left) and hdr background (right).
Lighting
Sun
Turns on the sun.
Sun Settings
Opens the Sun panel.
Skylight
Turns on skylight.
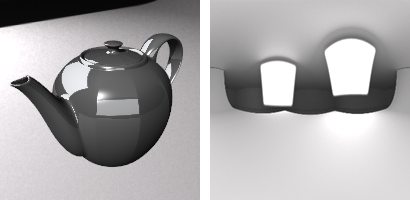
Skylight off (left) and Skylight on (right).
Intensity
Adjusts the skylight intensity.
Use custom environment for skylighting
Sets an environment that is used as sky light.
New
Creates a new environment using a template from the library.
Edit
Edits the selected environment.
See: Environment Editor.
Duplicate
Copies the selected environment to a new environment with the same settings.
Lights
Opens the Lights panel.
Use lights on layers that are off
Controls whether or not spotlights that are on hidden layers or that are hidden with the Hide command are rendered.
Snapshots
The Snapshots command saves and restores Named Views, Named Positions, Layer States, as well as rendering settings, object settings including locked/hidden state, display mode, material, position, light settings, curve piping, displacement, edge softening, shutlining, and thickening.
Wireframe
Render curves
Curve objects are rendered with the surfaces.
Render surface edges and isocurves
Surface isoparametric curves and edges are rendered with the surfaces. Edge thickness set in the Rendered viewport apply.
Render dimensions and text
Dimensions and texts are rendered with the surfaces.
Snapshots
The Snapshots command saves and restores Named Views, Named Positions, Layer States, as well as rendering settings, object settings including locked/hidden state, display mode, material, position, light settings, curve piping, displacement, edge softening, shutlining, and thickening.
Dithering and Color Adjustment
Dithering
The rendered image is usually produced at a higher color depth than monitors and low-dynamic-range file types like bitmaps like JPEG, PNG, BMP can reproduce. The most important effect this causes is banding, which is a quantization error. Dithering reduces quantization errors and so gets rid of banding.
Both dithering methods, generally do the same thing. Sometimes, one might be better than the other, but in general, Simple Noise is the best.
See: Wikipedia: Dither.
None
No dithering.
Floyd-Steinberg
The algorithm achieves dithering by diffusing the quantization error of a pixel to its neighboring pixels.
See: Wikipedia: Floyd-Steinberg dithering.
Simple noise
A random variation of brightness or color information in images.
See: Wikipedia: Image noise.
Gamma
Image files are color corrected so that they can be loaded byte-by-byte into the RGB pixels of a computer screen and look right on a monitor. This means that the color response of a standard image is non-linear, that is, it is gamma corrected. Gamma refers to the power function that is used to correct the image.
The Gamma value changes, and therefore corrects the output of the image.
See: Wikipedia: Gamma correction.
Use linear workflow
The Rendered display mode supports a linear workflow for accurate color, gamma and lighting computation.
Gamma correction for bitmap images that are loaded from disk is removed (by the inverse of the amount in the Gamma edit box) so that they have a linear response before they are passed to the renderer. The renderer renders them in this uncorrected state. The gamma correction is applied to the entire finished image. This can do a better job of processing the color in rendered images.
Snapshots
The Snapshots command saves and restores Named Views, Named Positions, Layer States, as well as rendering settings, object settings including locked/hidden state, display mode, material, position, light settings, curve piping, displacement, edge softening, shutlining, and thickening.
Render Channels
 Automatic
Automatically enables the required render channels.
 Custom
Manually select the render channels to include in the rendering.
RGBA
Represents Red, Green, Blue, and Alpha transparency. It is mainly used for presentations.
Distance
Uses grayscale colors to represent the distance from the camera. The farthest pixel in the rendering is black. the nearest pixel is white.
Normal
Uses RGB values to represent the XYZ coordinates of normal directions. Red=X, Green=Y, and Blue=Z.
Albedo
The unshaded colors. It is the result of rendering a scene with totally uniform lighting and without shadows.
Advanced Rhino Render Settings
Seed
Change the seed value to vary the noise pattern.
Session
Samples
Amount of samples taken per pixel in the Raytraced viewport. More samples means better convergence, thus better quality.
Override Production Render Quality 
When enabled, the Render command will use the samples above to render the scene. Render quality settings will be ignored.
Ray Bounces
Maximum bounces
Maximum number of light bounces. For best quality, this should be set to a high value. However, in practice, it may be good to set it to lower values for faster rendering. Setting the maximum to 0 bounces results in direct lighting only.
Diffuse
Maximum number of diffuse bounces. The ray is generated by a diffuse reflection or transmission (translucency).
Glossy
Maximum number of glossy bounces. The ray is generated by a glossy specular reflection or transmission.
Transmission
Maximum number of transmission (light that is transmitted throughout a volume) bounces.
Volume
Maximum number of volume scattering bounces.
Transparency
Maximum number of transparency bounces.
Texture Baking
Texture Bake Quality
When decal textures, multi-channel textures, procedural textures, or textures using custom mappings are rendered by Rhino Render or in the Raytraced viewport, these texture types are converted into bitmap textures. Baking qualities control the bitmap texture resolution:
Low: 2048 x 2048 pixels
Standard: 4096 x 4096 pixels
High: 8192 x 8192 pixels
Ultra: 16384 x 16394 pixels
Disable: Do not bake textures.
When you zoom in close to an object, the types of textures may look pixelated in the rendering if the baking quality is less than required. Using a higher baking quality will fix the problem, but memory usage of the rendering will increase exponentially. If your textures cannot render correctly, you may need to select "Disable" to turn off Advanced Texture Preview in renderings.
The AdaptiveBakingQuality setting in Advanced settings limits the baking resolution by how big the baked texture pixels appear on the object in the world space.
- 0 = adaptive baking quality disabled
- 100 = bake to the level of document tolerance
- 200 = bake to the level of 2.00 * document tolerance (default value)
- n = bake to the level of n / 100 * document tolerance
 重置为默认值
恢复所有默认渲染设置。
 渲染
渲染
渲染当前的模型。
| Toolbar | Menu |
|---|---|
|
|
Render Open Last Rendering |
RenderOpenLastRendering 指令打开最后一次渲染储存的 .rimage 文件。
| Toolbar | Menu |
|---|---|
|
|
|
RenderOpenRenderImage 指令将选取的 .rimage 文件以渲染视窗打开。
| Toolbar | Menu |
|---|---|
|
|
Render Render Preview |
RenderPreview 指令可以在渲染窗口中以渲染品质较低,但速度较快的方式渲染当前工作视窗,以便快速预览。
-
10 samples and 2 for all bounce settings are used to render the preview. Rhino Render Advanced Settings are ignored.
| Toolbar | Menu |
|---|---|
|
|
|
RenderPreviewInWindow 指令可以在渲染窗口中以粗略的质量渲染当前工作视窗中的选定区域,以便快速预览。
-
10 samples and 2 for all bounce settings are used to render the preview. Rhino Render Advanced Settings are ignored.
| Toolbar | Menu |
|---|---|
|
|
|
RenderPreviewWindow 指令以粗略的质量渲染工作视窗中的选定区域,以便快速生成预览。
-
10 samples and 2 for all bounce settings are used to render the preview. Rhino Render Advanced Settings are ignored.
|
Toolbar |
Menu |
|---|---|
|
|
|
RenderReportImageFiles 指令可以打开一个对话框来管理外部图像文件。
这个指令是 RenderReportMissingImageFiles 指令的别名,默认情况下“仅显示丢失的图像文件”复选框是禁用的。
| Toolbar | Menu |
|---|---|
|
|
|
RenderReportMissingImageFiles 指令可以打开一个对话框来管理丢失的外部图像文件。
选项
 仅显示丢失的图像文件
启用后仅列出丢失的图像文件,未启用则还包括未丢失的图像。
 移除
移除
从列表中移除所选图像。移除后的图像不会再报告丢失。
 替换
替换
选择一个外部图像来替换所选的缺失图像。
或者,双击丢失的图像进行替换。
 采集
采集
将选定的图像收集到一个新文件夹中,图像的路径将会更新。
 在线搜索
在线搜索
从在线库中查找选定的缺失图像。
编辑
当使用选定的缺失图像文件进行渲染操作 (材质, 贴图或环境) 时,点击此按钮可以编辑相应的渲染内容。
或者,双击渲染内容进行编辑。
 批量替换
批量替换
重新定位包含丢失图像的文件夹的路径。
 全部复制
全部复制
将丢失图像的文件路径复制到剪贴板。
 另存为
另存为
将丢失图像的文件路径另存为文本文件。
关闭对话框。
| Toolbar | Menu |
|---|---|
|
|
|
RenderWindow 指令以工作视窗的分辨率在渲染窗口中渲染当前工作视窗中选定的区域。
| Toolbar | Menu |
|---|---|
|
|
|
SaveRenderWindowAs 指令将渲染视窗中的图像保存到一个文件。
步骤
- 在保存位图对话框中,选择名称、位置以及位图文件类型。
您可以将位图保存为 .bmp、.tga、.jpg、.pcx、.png 以及 .tif 等文件格式。
在脚本中,您可以按照带有文件名称的指令保存:
SaveRenderWindowAs "C:/My Images/Rendering Two.bmp".
另存为选项
保存 alpha 通道
如果格式支持透明度,则保存 alpha 透明通道。
| Toolbar | Menu |
|---|---|
|
|
Render Current Render |
SetCurrentRenderPlugIn 指令设定目前的渲染外挂程序。
您可以在 www.rhino3d.com/resources 找到其它的渲染插件。