后期处理渲染图片
标准渲染窗口内置了对克隆、保存为高动态范围贴图、后期效果、缩放和通道显示的支持。
工具列
 复制窗口
复制窗口
通过当前的渲染窗口复制出另一个渲染窗口,所有通道和后期效果设置均被保留。
 另存为
另存为
将当前的渲染图像保存为一个图像文件,渲染窗口还包含对 HDRi 和 OpenEXR 输出的内置支持,但这些格式需要由渲染器启用。
支持的文件类型
- Windows 位图 (.bmp)
- JPEG - JFIF Compliant (.jpg, .jpeg, .jpe)
- 便携式网络图像格式 (.png)
- 标签图像文件格式 (.tif, .tiff)
- Truevision Targa (.tga)
- HDRi 文件 (.hdr, .hdri)
- OpenEXR 文件 (.exr)
- Rhino 渲染影像 (.rimage)
 复制
复制
复制整个按钮图示至 Windows 剪贴板。
 显示 RGB 通道
显示图像中的所有颜色通道。
请参考: 维基百科: Channel (digital image)。
 显示 RGBA 通道
显示所有颜色组件,并将透明背景显示为网格线。
 显示红色通道
只显示红色通道。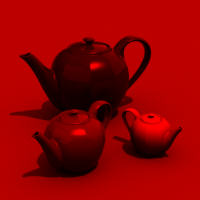
 显示绿色通道
只显示绿色通道。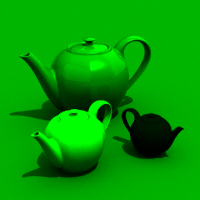
 显示蓝色通道
只显示蓝色通道。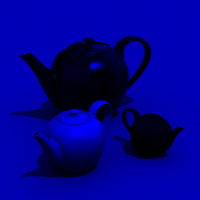
 显示 Alpha 通道
只显示 alpha (透明) 通道。
请参考: 维基百科: Alpha channel。
 显示距离通道
以灰度图像显示出 z-buffer (深度信息)。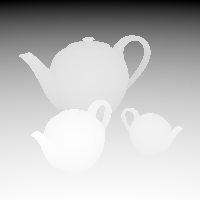
请参考: 维基百科: Z-Buffering。
 打开效果面板
打开效果面板,可以在该面板中调整图像以及为图像添加后期处理效果
 停止渲染
停止渲染
终止渲染进程。
 暂停
暂停
暂停与恢复渲染进程。
文件功能表
复制窗口
为当前渲染窗口制作一个副本。所有通道和后处理设置都会保留。
打开
打开一个已保存的 Rhino 渲染文件(.rimage)。这种格式是包含全部通道信息的无损图像格式。这种格式的文件再次打开后还能够添加后期处理效果。
另存为
将当前的渲染图像保存为一个图像文件,渲染窗口还包含对 HDRi 和 OpenEXR 输出的内置支持,但这些格式需要由渲染器启用。
支持的文件类型
- Windows 位图 (.bmp)
- JPEG - JFIF Compliant (.jpg, jpeg, .jpe)
- 便携式网络图像格式 (.png)
- 标签图像文件格式 (.tif, .tiff)
- Truevision Targa (.tga)
- HDRi 文件 (.hdr, .hdri)
- OpenEXR 文件 (.exr)
- Rhino 渲染影像 (.rimage)
最近使用
打开最近渲染的图像,这些图像是自动保存为 Rhino 渲染影响(.rimage)格式的。
Close
关闭渲染窗口。
编辑功能表
复制
复制整个按钮图示至 Windows 剪贴板。
视图功能表
工具列
显示/隐藏工具列。
效果面板
打开效果面板,可以在该面板中调整图像以及为图像添加后期处理效果
显示渲染图像
显示/隐藏图像。
缩放
缩放图像,增加或减少窗口中的像素大小。
通道
默认(RGB)
显示图像中的所有颜色通道。
请参考: 维基百科: Channel (digital image).
RGBA
显示所有颜色组件,并将透明背景显示为网格线。
红(R)
只显示红色通道。
绿(G)
只显示绿色通道。
蓝(B)
只显示蓝色通道。
Alpha(A)
只显示 alpha (透明) 通道。
请参考: 维基百科: Alpha channel。
距离
以灰度图像显示出 z-buffer (深度信息)。
请参考: 维基百科: Z-Buffering。
法线
使用 RGB 颜色显示法线方向。
如果平面的法线方向指向世界 +X 方向,则该面显示为纯红色。
说明功能表
显示当前渲染的帮助主题。
可以在效果面板中为渲染图像添加后期处理效果。
 默认为显示这个面板
To add a post effect
-
Click the
 button.
 -
Select a post effect from the list.
To remove a post effect
- Click the button behind the post effect.
To enable or disable a post effect
- Click on the checkbox in front of the post effect.
To reorder post effects
-
Drag a post effect up or down.
Post effects are executed from top to bottom.
曲线
确定曲线是否显示在渲染窗口中。
曲面边缘和结构线
决定是否将曲面边缘和结构线显示在渲染窗口中。
点和点云
决定是否将点和点云显示在渲染窗口中。
尺寸标注和文本
决定是否将尺寸标注和文本显示在渲染窗口中。
Bloom
The Bloom post-effect feathers the bright areas in an image to simulate lights in a dark scene.
Brightness threshold
The Bloom effect happens when pixels are brighter than this value.
Moving the slider towards the left will add more bloom effect to the image.
Radius
The Radius setting controls the feathering distance from the bright area.
Intensity
The Intensity setting changes the brightness of the bright area. The strength falls off towards the feathering boundary.
-
Move the slider to change the value.
-
Double-click the slider to enter a number.
-
Drag the slider past the right end to increase the max value.
Glow
Produces a bright area around specific colors. It can be used to make colored lights or objects appear to glow and works well with neon type lights.
Glow Properties
Radius
Determines the radius of the glow around the bright pixel. Increasing the radius blurs the glow effect.
-
Move the slider to change the value.
-
Double-click the slider to enter a number.
-
Drag the slider past the right end to increase the max value.
Intensity
Changes the brightness of the glow color.
On
Turns on the glow effect for the color.
Color
More color actions
Click the small triangle of the color swatch for more color actions.
Color Picker
Opens the Select Color dialog.
Eye Dropper
Picks a color from anywhere on the screen.
Copy
Stores the current color to Clipboard.
Paste
Pastes the color from Clipboard.
Sensitivity
Controls how much variation on the selected color is permitted when calculating glow on pixels close to that color.
 Add
Add
Adds a new glow color. Up to 8 colors can be used.
 Delete
Deletes the last glow color.
The fog effect adds depth-dependent coloration in the image and can be used to add anything from a thick fog effect to a subtle depth cue. In this way it is similar to the environment based Haze, but instead of being rendered at raytrace time, it is added afterward and can be adjusted in real time.

Fog Properties
Strength
Determines the maximum amount of fogginess. 0.0 means no fog at all (and therefore no effect), 1.0 represents total fog. Values higher than 1.0 can be used but only make sense when used with noise.
Fog Color
Adjusts the color of the fog.
Pick
Picks the color from the rendered image.
![]() Click the image to pick a color.
Click the image to pick a color.
Start distance
Specifies the distance from the camera at which the fog begins to appear.
Pick
Picks the depth from the rendered image.
End distance
Specifies the distance from the camera at which the maximum amount of fogginess is achieved.
Pick
Pick the depth from the rendered image.
Pick Area
Pick the area in the image.
Fog Background
Determines whether the background image is also made foggy. The background will be fogged at the maximum strength.
Feathering
Determines the number of pixels outside the bounding area to fade in the fogginess.
Preview the effect on the image as you change the values in the dialog box.
Depth of Field
Blurs the image depending on the distance from the camera.
Depth of Field Properties
Blurring Strength
Determines the amount of blurring. This is an arbitrary value and you will find different values will work better with different images.
Max Blurring
Determines the maximum Gaussian blurring radius used. Since extremely blurred areas can cause the effect to be slow, this limits the effect.
Focal distance
The distance from the camera at which the image is not blurry – in focus.
Pick
Pick the distance from the rendered image.
Blur background
Determines whether the background is blurry. The background will be blurred at the maximum effect.
Intel denoiser
A CPU based denoiser which works on mostly any system irrespective of CPU and GPU brands. Works on Windows and Mac.
Max Memory
The maximum memory can be used by the denoiser plug-in.
Information
Error messages of the denoiser display here.
NVIDIA denoiser
A GPU based denoiser which works only with NVIDIA GPUs on Windows.
Information
Error messages of the denoiser display here.
Which denoiser should you use?
The Intel denoiser is generally recommended, unless you use a Windows system with an NVIDIA display card in which case the NVIDIA denoiser is recommended.
 Tone Mapping tab
Tone mapping is the process of converting an high-dynamic-range image into a low-dynamic-range image. HDR means the pixel values can have red, green, and blue values that can be represented by a 32-bit floating point number. These values can either be smaller than 1 which means there will be a quantizing error (fixed using dithering), or they can be above 1.0 which might mean they are brighter than the maximum value of the color channel on a monitor (for example, more than 255).
When values are "brighter than white," they will be burned out on the screen. They can be brought back into the screen/bitmap color gamut using tone mapping, which is the process of remapping the color in an image so that the brighter areas are better represented. The options offer a number of ways of doing this.
See: Wikipedia: High dynamic range imaging.
Black / White point
Linear interpolation between two points that are specified as black and white. In a normal image, these are 0.0 and 1.0.
Black point
Specifies the numerical value for the black point.
White point
Specifies the numerical value for the white point.
Logarithmic
Changes the response curve to a power function so that the upper range is slowly given less prominence. It is based on logarithmic compression of luminance values, imitating the human response to light.
Histogram
A graphical representation of the tonal distribution in a digital image. It plots the number of pixels for each tonal value. By looking at the histogram for a specific image, you can judge the entire tonal distribution at a glance.
 最终效果选项卡
伽马
Image files are color corrected so that they can be loaded byte-by-byte into the RGB pixels of a computer screen and look right on a monitor. This means that the color response of a standard image is non-linear, that is, it is gamma corrected. Gamma refers to the power function that is used to correct the image. The Gamma value changes, and therefore corrects the output of the image.
- 当渲染器不支持线性工作流时,后处理效果中的伽马将被禁用。
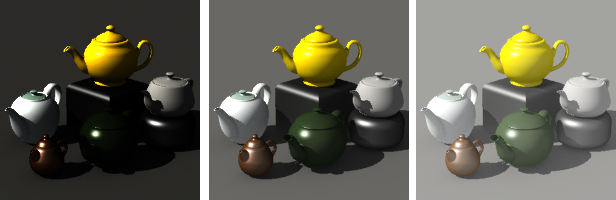
伽马小于 1 (左),等于 1 (中), 大于 1(右)。
请参考: 维基百科: Gamma correction。
抖动
在某些情况下,渲染中可能会出现明显的色阶问题,可以通过打开抖动来进行修复。
|
|
|
|
渲染中的色阶。
|
通过抖动去除明显的色阶。
|


请参考: 维基百科: Dither。
无
不使用抖动。
Floyd-Steinberg
图像处理软件常用的算法,例如,当图像被转换成GIF格式,最大的颜色数量被限制在 256 色。
简易噪点
随机噪点。
水印
在渲染图像的左下角添加一个文本块,说明渲染开始、结束和经历的时间。
字体
用于水印文本的字体。
字体大小
水印文本的高度(以像素为单位)。
字体颜色
水印文本的颜色。
透明度
水印文本图块的可见性。
Hue/Saturation/Luminance
Hue
Adjusts the material color after rendering.
The idea is this way you can try different color combinations without having to re-render the whole scene.
Since the hue adjuster works on the pixels of the rendered image, it has no knowledge of what contributed to the color of the pixel other than the topmost object. For example reflections of the object on other objects and parts of the object seen through transparent objects will not update.
Sat
Sets the saturation amount. The smaller the saturation, the more monochromatic the image.
Lum
Sets the luminance amount.
Brightness/Contrast
Bri
Changes the overall brightness of the image.
Con
Increasing contrast makes dark pixels darker and bright pixels brighter. Colors in the image will be more distinguishable.
Decreasing contrast changes colors towards the neutral gray. The image will look less sharp.
Noise
Noise adds noise to the image. By default RGB channels are separated, so adding noise to a gray-scale image makes individual pixels shift towards random color.

Monochromatic
Only the darkness/lightness of the pixel is altered. The color stays the same.
Gaussian blur
Adds Gaussian blur to the image. The number is the radius of the blur kernel, equivalent to the same setting in paint applications.
Horizontal
Specifies the blurring to be horizontal. This can be used to create a horizontal motion blur effect.
Vertical
Specifies the blurring to be vertical. This can be used to create a vertical motion blur effect.
Both
Blurs in both directions.
Rhino Image File Format (.rimage)
Rhino Render can save .rimage files. This is a proprietary file format that stores all of the information rendered by the rendering engine, including color, alpha, depth, normal channels, all with 32-bit per-channel resolution.
This information is used by the render window to execute the post-effects and exposure operators, and can also be used by custom controls implemented by a third-party renderer to achieve other effects.
Immediately after render time, the .rimage format can be used to store the data so that post-processing and exposure adjustments or format changes (saving in a different format without loss of information) can be done later.
The .rimage format is only supported by the Rhino render window. It cannot be loaded into any other software. It is a high-dynamic range format that supports lossless information transfer to .HDR and .EXR formats. It is uncompressed and the files can be huge.
To open an .rimage file
- In the Rhino render window, on the File menu, click Open.
Or - Use the RenderOpenRenderImage command to open an .rimage file without having a render window open.
Completed renderings are saved in the .rimage format to a temporary location on your hard disk. Once one of the renderings is re-opened, all post effects and exposure settings are available as if the rendering were just completed.
To open the most recent .rimage file
- In the Rhino render window, on the File menu, click Recent, and then choose a file.
The files are named the by date and time of the rendering.
For more information about post processing the rendered image, see: Post-processing rendered images.