Environments
| Toolbar | Menu |
|---|---|
|
|
Window / Render Panels > Environments |
Environments 指令可以打开环境面板以编辑背景颜色、图像与投影
-
渲染内容 (材质、环境和贴图) 可以被插件或脚本隐藏。 更多信息...
![]() 环境面板
环境面板
环境面板工具列
环境面板有附加的浏览工具。
 Add Environment
Click ![]() to select an action to create a new texture.
to select an action to create a new texture.
 Search
- Click the search box (magnifying glass) to display a menu for searching names, notes, or tags.
 Search Names
Limits the search to names.
 Search Notes
Limits the search to notes.
 Search Tags
Limits the search to tags.
- When tags: is selected, a list of available tags appears. These tags are gathered from the materials, environments, and textures in the document.
- In the tags list, arrow keys move up and down and the selected tag is appended to the search.
- Type a semicolon to keep the selected tag and append a semicolon to the search.
- Backspace removes the last tag from the search.
- Once the focus is on the tags list, you can navigate the list using the keyboard with the semicolon and backspace keys appending and removing tags from the search without having to use the mouse.
Search info
Displays how 'name:', 'note:', 'tag:', '?', '#' and '^' are used for searching items.
 功能表
功能表
显示工具功能表。
 说明
说明
Thumbnail indicators
The icons at the lower-right corner of an environment thumbnail indicate usages of the environment.
![]() The environment is used for reflection and refraction raytracing.
The environment is used for reflection and refraction raytracing.
![]() The environment is used as the skylight for lighting the scene.
The environment is used as the skylight for lighting the scene.
![]() The environment is used as a 360° background.
The environment is used as a 360° background.
![]() The external background image used by the environment is missing.
The external background image used by the environment is missing.
- Pointing the mouse cursor to the icon shows information about the missing image.
- If any missing image is detected when Rhino opens a model, the Missing image files dialog appears.
- The Save textures option in the Save dialog stores images in the 3dm file to prevent images from missing.
Thumbnail actions
- 按鼠标右键可以弹出快显功能表。
- 右键点击缩略图浏览窗口中的空白部分将弹出快显功能表。
- 以鼠标右键在缩略图上点击并拖曳可以更改视图。
-
Double-click a thumbnail to edit in a floating window.
Drag and drop actions in the list section
- Drag and drop to a different position in the list to reorder.
- Drag and drop with Ctrl to a blank area to make a copy.
- Drag and drop with Alt to a blank area to make an instanced copy.
名称
环境的名称。
See: Naming conventions in Rhino
类型
设置环境类型。
![]() 基本
基本
基本环境设定
背景
基本环境是一个简单的背景颜色,也可以设置以贴图,贴图可以设置为平面、球形(等距圆柱投影或经纬度投影)或立方。
设置背景颜色
- 为环境背景选取颜色。
You can drag the color swatch to a folder to create a Rhino color file (.rcolor).
To add this color to a color library
- Drag it from a folder to another color swatch in the Materials, Environments, or Textures panels, or you can drag it onto an object.
背景图片
选取一张图片作为环境背景。
选取一张图片
- 点击贴图控制。
(按此赋予贴图)
第一次执行此操作时,复选框将被自动选中。
您可以取消勾选复选框以关闭材质赋予。 - 选取一个图片文件。
投影
设置背景图的投影方式。
平面
不论视图方向为何,渲染时都以选取的图片填满背景。
金属球反射
又称为角度鱼眼投影 (Angular Fisheye Projection),或正方位等距离投影 (Azimuthal Equidistant Projection)。以椭圆将贴图分段并映射到球体上
请参考: 维基百科: Azimuthal equidistant projection。
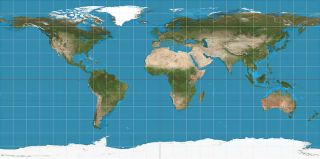
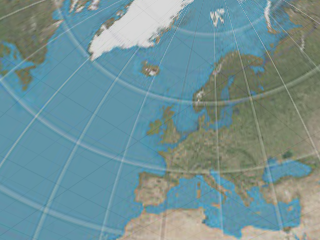
球面矩形
又被称为球形投影,图片的水平中心线对应到球体的赤道。
请参考: 维基百科: Equirectangular projection。
立方体贴图
将贴图并排分割为等大的六份分配给立方体的每个面。
请参考: 维基百科: Cube mapping。
垂直十字立方体贴图
六个方向的平面投影图片以垂直十字排列做为环境背景。高度方向每个面为高度的四分之一,宽度方向每个面为宽度的三分之一。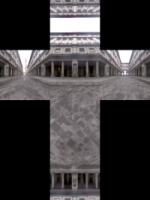
水平十字立方体贴图
六个方向的平面投影图片以水平十字排列做为环境背景。高度方向每个面为高度的三分之一,宽度方向每个面为宽度的四分之一。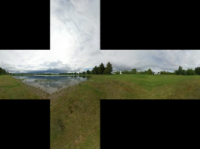
环境贴图
以椭圆将贴图分段并映射到球体上。这种投影是由正交摄影机拍摄的球体镜像照片产生的。
半球体
类似球形投影,但是整个贴图映射到球体的上半部分,贴图的底部边缘一直延伸到球体的下半部分。
旋转
设置环境的旋转,设置旋转有助于将贴图放置到正确位置,以获得正确的光线反射与光照。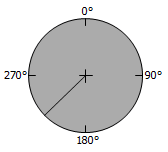
强度
设置环境的强度。
Save and share render content
Render content (materials, environments, and textures) are stored in models. They can also be saved to files and shared across models. The Libraries panel displays the default content folder. Content can be dragged and dropped between Rhino sessions or between a Rhino window and a disk folder.
进入指令行选项
- 在指令名称前面加上横线: -Environments。
| 指令行选项 | |
|---|---|
|
显示面板 |
显示环境编辑器面板。 |
|
选项 |
显示命令行选项。 新增删除重命名更改建立副本从文件载入保存到文件 |
请参考
Materials
Open or close the Materials panel.
Textures
Open or close the Textures panel.
Render
Render the objects using the current renderer.
Resolving render content conflicts
Rhino detects material, environment and texture name conflicts in the following file operations:
- Import a model.
- Insert a model.
- Paste objects from a different model
- Attach or activate a worksession model.
When a render content item name already exists in the current model, but the content settings are different, the conflicted items will be resolved based on the related advanced settings.
Search for PasteConflictOption (for paste) and ImportRenameConflictingEx (for import and insert) in Advanced settings and change the value as described below.
0 = Do not import incoming conflicted render contents.
1 = Import and rename incoming conflicted render contents with [imported] post-fix.
2 = Import incoming conflicted render contents and overwrite existing ones.
3 = Pop up the Render Content Name Conflict dialog and let you decide how to resolve the conflicts.