CPlane
| Toolbar | Menu |
|---|---|
|
|
View / Viewport title Set CPlane |
CPlane 指令设置当前工作视窗的工作平面原点及定位。
工作平面就像一个光标可以在上面移动的桌面,工作平面由原点、X轴、Y轴和格线构成,工作平面可以设置到任意方向上,每一个工作视窗的工作平面与其他视窗的工作平面相互独立。
工作平面和世界坐标系是不同的,工作平面代表工作视窗自己的坐标系统。
Rhino 的标准工作视窗配备了与之对应的工作平面,但是默认的 Perspective(透视)工作视窗所使用的工作平面与 Top(顶视)工作视窗的工作平面相同。
步骤
- 指定新工作平面的原点,或选择选项。
| 指令行选项 | |
|---|---|
|
将所有工作视窗的工作平面原点移至指定的位置。 |
|
|
|
曲线选项可以设置工作平面与曲线垂直。 曲线设置步骤
|
|
输入 subcrv 选取曲线上的一部分作为指令的输入。 |
|
|
|
垂直高度选项在 Z 轴上移动工作平面。 垂直高度设置步骤
附注
|
|
操作轴 |
操作轴选项可以将工作平面对应设置到已选取物件的操作轴上。 |
|
|
物件选项将使用中的工作视窗的工作平面定位至物件上。 物件设置步骤
|
|
|
旋转选项可以旋转工作平面。 旋转步骤
|
|
|
曲面选项设定工作平面至曲面上的指定点,并与曲面正切。 曲面选项反转反转物件的方向。 不论修剪与否使用整个未修剪曲面。 |
|
在当前工作视窗中沿其z方向移动工作平面,因此其xy平面与选定点相交。 通过选项设置步骤
通过选项全部在所有工作视窗中沿其z方向移动工作平面,因此其xy平面与选定点相交。 |
|
|
|
将使用中的工作视窗的工作平面正对视图 视图设置步骤
|
|
重置指定的默认工作平面。 世界选项设置步骤
|
|
|
|
三点选项以指定新工作平面的 X 与 Y 轴的方向设定使用中工作视窗的工作平面。 三点的选项垂直设置垂直于当前工作平面的工作平面。 Z轴以 Z 轴的方向设定工作平面。 |
|
|
将变更前的上一个工作平面设置到当前工作视窗。 复原步骤
快捷键Shift + Home |
|
|
将工作平面复原到使用复原选项之前的状态。 重做步骤
快捷键Shift + End |

|
Toolbar |
Menu |
Status bar |
|---|---|---|
|
|
Auto CPlane |

The AutoAlignCPlane command turns Auto CPlane on/off and manages the related options.
-
When Auto CPlane is enabled, the CPlane in the current viewport automatically aligns with the selected geometry. It works with a planar curve or surface edge, as well as a surface or sub-surface, which can be either planar or non-planar.
When Auto CPlane is turned on, the CPlane in the current viewport automatically aligns to a selected curve, surface edge, surface, or sub-surface. The curve and surface edge have to be planar, while the surface or sub-surface can be either planar or non-planar.
-
Auto CPlane can be toggled on/off by clicking the Auto CPlane pane on the status bar.
-
If the selected curve or surface is coplanar with the current CPlane, or the surface has a seam, Auto CPlane will not activate.
-
In parallel viewports, Auto CPlane will not activate if the view angle to the CPlane is lower than 15 degrees.
-
The AutoAlignCPlane command can be run nested in other commands to change options from the command-line.
-
Auto CPlane orientation is view related by default. If you like Auto CPlane to orient consistently on an object, you can disable OrientAutoCPlaneToView in Advanced settings.
指令行选项
Enabled
Turns Auto CPlane on/off .
- Clicking the Auto CPlane pane on the status bar toggles this option on and off.
模式
The alignment mode can also be set by right-clicking the Auto CPlane pane on the status bar.
物件
Aligns the CPlane with the plane of the selected curve or surface.
世界
Attempts to keep the X and Y axes of the CPlane aligned with the closest world axes.
视图
Attempts to keep the CPlane Y aligned with the camera up of the view.
Cycle
Changes the alignment mode through Object, World, and View.
Keyboard: Ctrl(CMD)+R
锁定
Locks the CPlane to the current position and orientation.
Keyboard: Ctrl(CMD)+1
-
The Locked option is only available when an Auto CPlane is active before the AutoAlignCPlane command runs.
-
The lock
 /
/ icon on the Auto CPlane pane indicates the current locking state.
 -
Click on the lock icon to toggle the locking state.
-
Sticky
The CPlane stays on the previously selected planar object/sub-object until another one is selected.

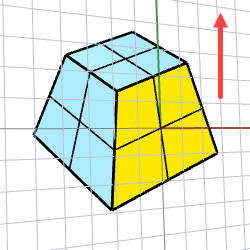
Example of using Auto CPlane
-
Click Auto CPlane on the status bar to enable Auto Aligned CPlane.
-
Use Sub-object selection to select a face on a polysurface by Ctrl(CMD)+Shift+Click.
-
Draw a circle.
The circle is co-planar with the face.
-
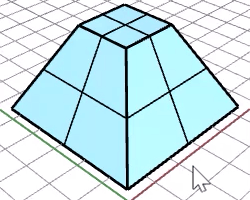
Deselect the face.
-
Select another face on the polysurface.
-
Draw a circle.
The second circle is co-planar with the second face.
| Toolbar | Menu |
|---|---|
|
|
|
CopyCPlaneToAll 指令将选取的工作视窗的工作平面设定套用至所有其它工作视窗。
| Toolbar | Menu |
|---|---|
|
|
|
CopyCPlaneSettingsToAll 指令套用选取的工作视窗的工作平面设定 (格线设定、锁定间距) 至所有其它工作视窗。
请参考
MPlane
Set up a relationship between a construction plane and an object.
NamedCPlane
Manage the named construction planes list.